Scan to Shared Folder via SMB on MacOS HighSierra – Kyocera (M6526cidn)

Today I set up my system with Mac OS High Sierra and again encountered issues while using my Kyocera printer to scan to a folder on my Mac.

The initial steps were to enable file sharing via SMB (without encryption!) and then set up the Kyocera as discussed in several blogs.

Finally when it was working, I noticed that it would save everything under the username I have chosen, but all other users were not able to open the scanned files. So, that was the typical user – group – rights issue in a SMB connection. What solved my issue was posted on a website and reads:

Firstly enable ACL permissions for SMB shares with the following command.

sudo defaults write /Library/Preferences/SystemConfiguration/com.apple.smb.server AclsEnabled -bool YES

Then set up inheritance permissions on the parent holder with the following command. This should recursively go through your share and apply the relevant permissions.

sudo chmod -R +a "group:REPLACE_WITH_YOURGROUP_NAME:allow readattr,writeattr,readextattr,writeextattr,readsecurity,list,search,add_file,add_subdirectory,delete_child,file_inherit,directory_inherit" REPLACE_WITH_PATH_TO_PARENT_SHARED_FOLDER

This worked perfectly for me! Now I am happy to use the scanning to folder function safely on my Kyocera.

Restore iCal Calendar Entries

I had shared this family calendar and forgotten about it … until I used it again to enter several appointments. Unfortunately, one family member thought that was a mistake and they had to be deleted. Which let me scratch my head, how I could restore those calendar entries either on Mac OS or in iOS.

First, I remembered that the calendar affected was an iCloud calendar. Second, Google delivered the following KB article upon searching:

https://support.apple.com/en-us/HT205018

And yes! This worked flawlessly. I was able to fetch a backup from just after midnight (12:35 AM, at first got afraid that no backup was available, until I checked that 12:35 AM is right after midnight, here in Germany we would say 0:35 hrs … ) and restore the calendar content. That worked and I had all my appointments back. Easy, wasn’t it?

PS: If your lost entries were not from an iCloud calendar, then you might try this solution:

https://discussions.apple.com/thread/3851319

AntiSpam with spamtrainer on Mac OS Server – El Capitan

So I am still running Mac OS El Capitan Server Edition on my Mac Mini. Recently, the Spam that comes through, has increased again and I wondered if there is any mechanism to implement AntiSpam in Mac OS X.

The Apple Knowledge Base only gives this article:
https://support.apple.com/kb/PH22351?locale=en_US
which is not exactly what I wanted.

Looking further, I came across these links, which proved helpful at the end:

spamtrainer

According to that site the software will do this:

  • spamtrainer assists Mac OS X Server mail services administrators in updating and maintaining their SpamAssassin bayes database.
  • spamtrainer will read the designated HAM and SPAM mailboxes, update the SpamAssassin databases and delete mail that has been learned from.

After downloading the spamtrainer installation script and installing it I did the following:

Check the proper setup of junkmail / nojunkmail

sudo serveradmin settings mail:imap | grep junk

Result:

 mail:imap:junk_mail_userid = "junkmail"
 mail:imap:not_junk_mail_userid = "notjunkmail"

When running spamtrainer now right away, it complains:

Either there is no mailbox called No GUID found for user: junkmail in the mailpartition or it has never been fed with mail.

Either there is no mailbox called No GUID found for user: notjunkmail in the mailpartition or it has never been fed with mail.

So I go an create those users. Starting the Server.app plus adding the needed network accounts „junkmail“ and „notjunkmail“. Further I edit access so that these accounts only have access to the Mail service. Now I add these accounts to Mail so that I have access to them.

Now, finally, when I run

/usr/local/sbin/spamtrainer

it does what it should.

Using the install option I can also have it run as plist item.

>> /usr/local/sbin/spamtrainer -i

Checking if there is a startup item for 'learn_junk_mail' or 'spamtrainer'

There IS a plist for sa_learn.pl

... and it is ENABLED

If you want to use 'spamtrainer' it is RECOMMENDED that this be disabled

Would you like me to disable it for you (yes/no)

yes

'learn_junk_mail and/or sa_learn.pl' item has been disabled'

You can ignore 'No such process' error messages

There IS NO plist for spamtrainer

if you want to use 'spamtrainer' it is recommended that this be added

Would you like me to enable it for you (yes/no)

yes

What time would you like spamtrainer to run (24-hour format)?

Please enter the hour (1)

05

Please enter the minutes (0)

00

Would you like SPAM/HAM messages to be deleted after the learn process? (n)

y 

Would you like to log bayes stats into /var/log/spamtrainer.log? (n)

y

If you would you like to have spamtrainer mail you a report after it runs, then please enter an e-mail address. Enter for no (n)

myemail@myemaildomain.domain

Enter name of mail store with SPAM/HAM mailboxes? Enter for default (default)

Enter name of mailbox with SPAM? Enter for default (junkmail)

Enter name of mailbox with HAM? Enter for default (notjunkmail)

A plist with the following parameters for 'spamtrainer' has been prepared

/usr/local/sbin/spamtrainer -m myemail@myemaildomain.domain -d -l

It will run each day at 05:00:00

Would you like to add and enable it? (yes/no)

yes

The following launchd plist item for 'spamtrainer' has been enabled'

/usr/local/sbin/spamtrainer -m myemail@myemaildomain.domain -d -l

It will run each day at 05:00:00

That is all for installation, now let me see if it does what it should!

Sent Messages or Sent – Getting Apple Mail and Spark to work together

For my iPhone I just love Readdle’s App called Spark. On MacOS I am still clinging to Apple Mail. Since all my Mail is stored on my Mac Mini MacOS server, I also work with server based folders. Here I noted a discrepancy between Apple Mail and Spark, because both programs use different presets for saving mail on the server. Fortunately I came across this websavers article, how to get both to work together smoothly.

Apple Mail Preferences

Apple Mail defaults to a sent mailbox/folder named „Sent Messages“. If the option to „Store sent messages on the server“ is active it will create a folder called „Sent Messages“ on the server and use that folder to save copies of sent messages. This conflicts with many other applications with use the folder „Sent“ instead.

Spark Default Preferences

As I am not yet on Sierra, the second part of the article did it for me:

  1. Select the „Sent“ folder on the server (in the folders pane on the left) by clicking on it once. It should *not* be at the top of the page next to Inbox/Drafts/Junk/etc, nor should it be under „Local Folders“ or „On My Mac“. It will be found under a heading indicating that it’s a server-side folder. For example, my heading says „Websavers“ as it’s my Websavers email account.
    If you do not see a server-side heading in the folder list or if you do and there is no Sent folder there then you must create a new folder by choosing the Mailbox menu, then „New Mailbox“. For the Location field, you must select the correct account to create it under, then set the name to „Sent“.
  2. Chose Mailbox from the system menu at the top of the screen
  3. Choose „Use this Mailbox as“ > and then choose „Sent Mailbox“.


Downloading Kaspersky Internet Security for Parallels 12

Parallels comes with this awful menu entry:

Kaspersky Internet Security Install Option from Parallels Menu

„Install Antivirus for Mac“.

KIS Install DMG

Ok, if you would like to go from there – no problem. But if you would like to install this license on another Mac it gets a bit difficult to acquire the installation kit.


I thought I would download it from the regular Kaspersky website, but unfortunately – the Parallels license key doesn’t work with the regular download package.

I contacted Parallels about it and got a confirmation for this behaviour:

The parallels code can only be used with a Parallels versions of Kaspersky, it cannot be registered with a trial version. The Parallels version of Kaspersky can only be downloaded from Parallels‘ servers. There is no external download source.

This is also reflected in the Parallels KB article (123871).

Of course, there must be a way. So I fired up Wireshark to see, where the installation kit gets downloaded from! And voilá – here we go with the direct download link:

http://download.parallels.com//desktop/v11/is/binaries/kismac16_0_0_245mlg_de_en_es_fr_it_ja_pl_ru_zh-Hans_zh-Hant.dmg

Revealing the Download URL for Parallels KIS
Direct Download Link for Parallels Version of Kaspersky Internet Security

Apple MacOS Server and iOS don’t like StartCom Certificates

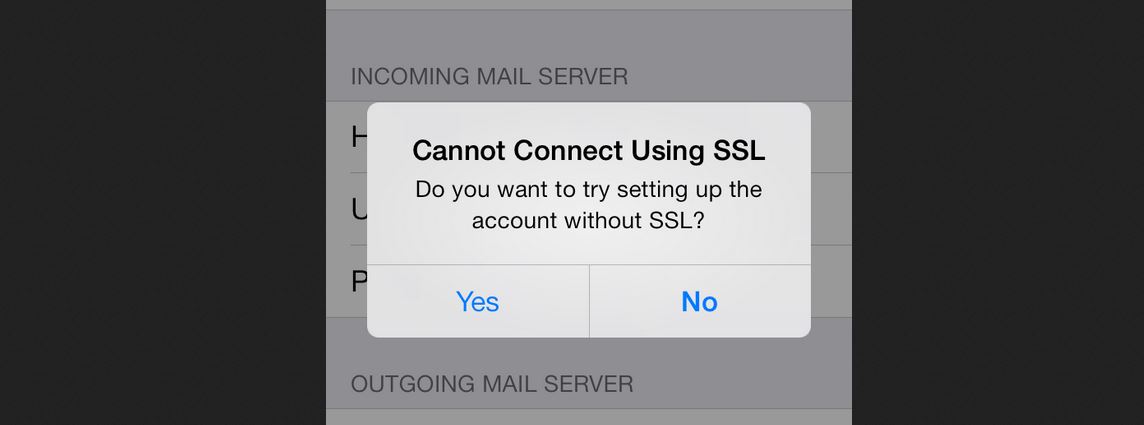
An error reading „Cannot Connect Using SSL“ on my iPhone caused me some extra grey hair: The symptoms I observed since mid of December were:

  • iOS Mail came up with a SSL error when trying to negotiate SSL/TLS through the IMAP service on my MacOS server. Adding a new mailbox was not possible, Apple Mail always suggested to turn of SSL (which I didn’t want to do for good reason).
  • My Squirrelmail webbased email reader suddenly couldn’t connect to the IMAP mailbox anymore. The error observed was: „Error connecting to IMAP server: <server_name>. 0

First I thought that there was a problem with the MacOS Server, but when I switched to a self signed certificate – things worked OK again (only with the hint that I use an untrusted cert of course).

After some more googling around for the symptoms I observed, I came across this article Lists of available trusted root certificates in iOS (in German). It clearly mentions, that from December 2016 onward, the certificates of StartCom (which were available also cost free) are not recognized anymore. Now, my MacOS Server did not throw any error in the Server Manager, but the services didn’t work as expected anymore.

And for testing Squirrelmail, I found this very nice information at James Bottomley’s random Pages:

echo 'fsockopen("tls://yourmailserver.domain",993,$errno,$errmsg,15);'|php -a

I used it to check the connection to my mailserver, and look and behold, I got to see the PHP error that I had a certificate issue!

So I decided to order a RapidSSL certificate to replace the StartCom certificate. Said and done, set it all up, and voilá – all services are running smoothly again.

While the Server App correctly changes certs for all services including the postfix Mail service, I have configured TLS manually in the postfix main.cf as this was a requirement for my outbound mail forwarder. These configuration statements I always have to change manually when updating the certificate. Now there is at the end of the file:

smtp_tls_cert_file = /etc/certificates/<hostname>.ID.cert.pem
smtp_tls_CAfile = /etc/certificates/<hostname>.ID.chain.pem
smtp_tls_key_file = /etc/certificates/<hostname>.ID.key.pem

For the correct keys just compare to the statements before, like:

smtpd_tls_key_file = /etc/certificates/<hostname>.ID.key.pem
smtpd_tls_cert_file = /etc/certificates/<hostname>.ID.cert.pem

If you run into similar troubles as described above, I suggest to get a „real“ SSL certificate which is trusted by the Apple OS. I got mine from the folks at CheapSSL.com.

Dual Monitor Setup with Two Different Backgrounds in Windows 10

Ok, this is rather a gimmick, but this was the wish behind: I have a dual screen setup in my office. Normally, the same desktop wallpaper would be shown on both displays. Now I have a list of internal telephone numbers and wanted to display those only on one of the desktops. I created two different wallpaper images, one with the phone number list, the other without. This is the way how you can display two different images without any additional software:

  1. Copy the background images into the path: C:\Windows\Web\Wallpaper\Windows.
  2. Now use the CTRL key for multiple selection to select both backgrounds.
  3. Right click on one wallpaper image -> Choose „Set as desktop background“.

The selected wallpaper images will be stored under:
%USERPROFILE%\AppData\Roaming\Microsoft\Windows\Themes
as:
Transcoded_000 and Transcoded_001 without extension

If you want to swap the images, just rename 0 to 1, 1 to 0. Sign out and sign back in or right click on desktop and select: Next desktop background.

(This solution was originally published here.)

Substitute the failing Seagate Series ST3000DM001

I love my two Promise Pegasus R4 Thunderbolt Storage Shelters. Some months ago I upgraded the Backup Storage to 3TB drives, Seagate’s ST3000DM001. Unfortunately, as Backblaze reveals, this series is very buggy and not at all recommendable. So, whenever one of the drives had failed, I would substitute it with a Seagate ST4000DM000 drive, which is a 4TB model. Backblaze shows, that this model is quite ok when it comes to error statistics. What I always thought was, that Promise Pegasus R series would only support the drive models which can be found in the Pegasus Promise compatibility listing. But No! What drives can be used with Promise Pegasus R4, R6 or R8?

Then today, when another of Seagate’s 3TB drives failed, I looked for a substitute and came across the Seagate ST4000VN000 – which is listed as proper NAS drive. I was courageous and bought one from Cyberport and hoped it would fit and work in my Pegasus Promise R4. As you can see here:

Screen Shot 2016-08-06 at 21.52.55

The RAID is being rebuilt ...
The RAID is being rebuilt …

Thus I can say with confidence:

The Seagate NAS drive ST4000VN000-1H41, which is a typical SATA drive with 4TB capacity, runs well in the Promise Pegasus R series, even though it is not listed in the compatibility list. And I am still running on firmware release 5.04.0000.36. The benefit of this slightly more expensive hard disk is a 3 year warranty (within Germany) and – as Seagate claims – some extra routines to make it work 7×24.

Kyocera M6526cidn & Scan to Folder & SMB Shares on MacOS El Capitan Server

After Upgrading to El Capitan, my Kyocera MFC didn’t want to save scans via SMB connection anymore. This brought me to google wildly after any solution, and I came across these documents, which kept enlightening me:

As I had set up a user named „scanuser“ in the Mac OS Server App, I kept looking there, why it wouldn’t work. I changed permission rights and even switched the system back to SMB v1, by entering the following in a console window:

echo "[default]" >> ~/Library/Preferences/nsmb.conf; echo "smb_neg=smb1_only" >> ~/Library/Preferences/nsmb.conf

If you need to change it back, you just enter:

rm ~/Library/Preferences/nsmb.conf

But, to no avail!

So I looked into System Preferences and Users again and thought, I might create a local user called „scanuser“. This I did, and suddenly my Kyocera printer & scanner was willing to talk to the SMB share on my Mac OS Server again.

Traffic Attack from Baidu Address Space

Yesterday I noticed that one of my servers was seeing more traffic than usual. The hourly traffic limit I had set was reached and my mailbox filled with traffic warning messages. I wanted to look into the matter but wondered: how can I quickly see which IP connections exist? Fortunate to be on a Debian Linux, I decided to install the package iptraf. This IP LAN monitor generates various network statistics and showed me that most of the new connections came from one particular IP range: 180.76.0.0/16. WHOIS DB shows, that this range belongs to BAIDU, the famous search enterprise in China. Generating several hundred Megabytes of traffic per hour was too much for me. You can see the traffic line here:

Graph showing the Baidu Traffic Attack
Start of the Baidu traffic phenomenon
Graph showing the Baidu Traffic Attack
Trying to counter the Baidu traffic phenomenon.

First of all I thought it might be the indexing work of many Baidu spiders, or of spiders claiming to be Baidu. In this regard, I found a very helpful post by the folks at Perishablepress, which explains how to block the Baidu spidering process through the .htaccess file.

This did not really solve the problem, so I took more serious measures and blocked the whole address space of Baidu via iptables Firewall. This is the command you need (please be root before using it):

iptables -A INPUT -s 180.76.0.0/16 -j DROP

Just remember, that this statement really blocks all the traffic from the Baidu network. So if your servers are meant to reach Chinese visitors, you might want to think twice before you block it all!

Advertisment ad adsense adlogger